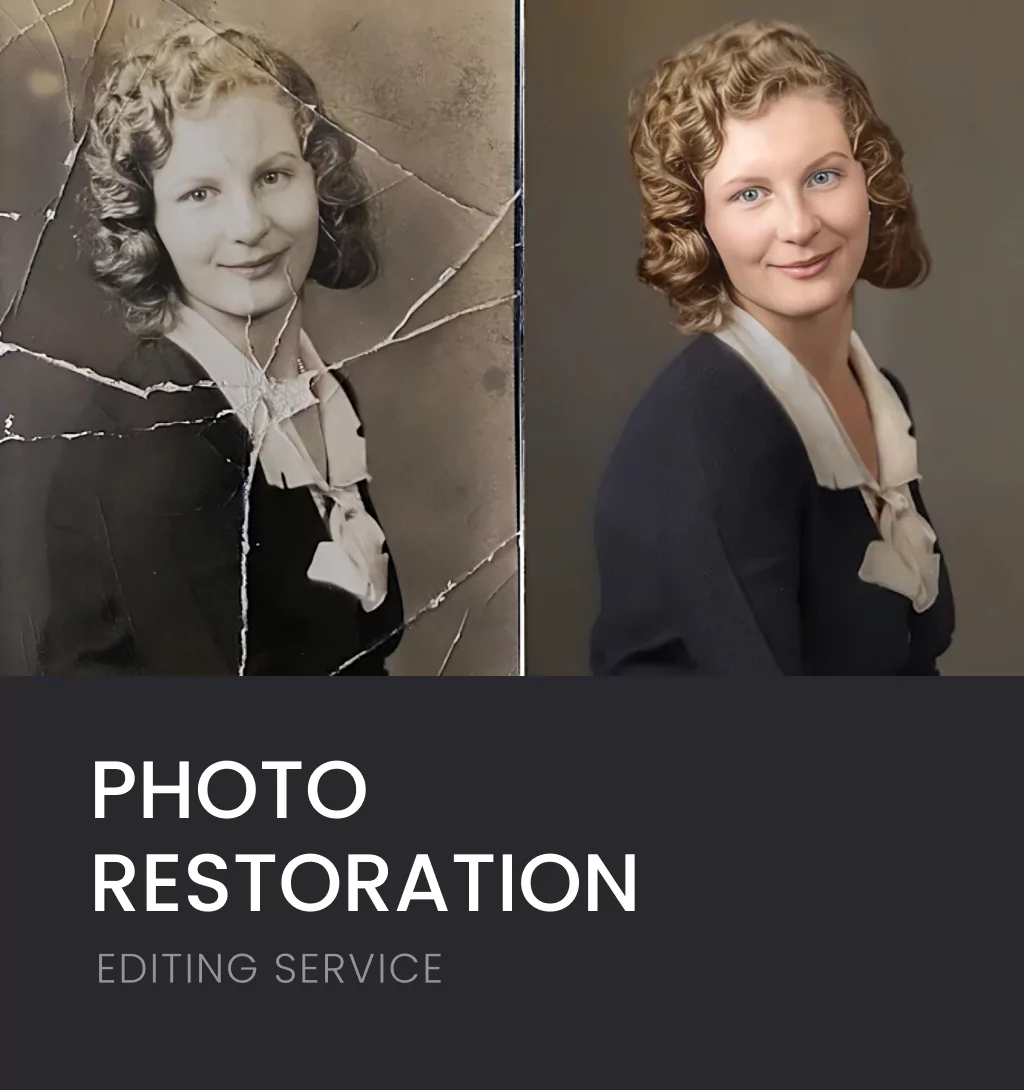
Old photographs are more than just pictures; they’re memories frozen in time. Over the years, these precious memories can become damaged, faded, or torn due to aging, moisture, light exposure, or improper storage. Whether it’s a childhood portrait, a family wedding picture, or an ancestral photograph, seeing it deteriorate can be heartbreaking.
Thankfully, with modern photo restoration techniques, it’s possible to fix damaged photos and bring them back to life without losing their original quality. This process not only repairs visible damage but also preserves the emotional and historical value that these photos hold.
In this guide, we’ll explore how to restore old or damaged photos while maintaining their natural look, the tools and techniques professionals use, and how you can ensure the best results when reviving your cherished memories.
1. Understanding What Causes Photo Damage
Before we talk about fixing, it’s important to understand what causes photo damage in the first place. This helps in choosing the right photo restoration method.
Common causes include:
- Moisture and humidity: Causes mold, stains, and fading.
- Sunlight exposure: Leads to color fading and paper brittleness.
- Improper storage: Results in scratches, tears, and dust accumulation.
- Chemical reactions: Over time, photographic paper reacts to air and pollutants, discoloring the image.
Each type of damage requires a different approach to restore without affecting the original image quality.
2. The Importance of Digital Photo Restoration
Traditional photo repair methods like gluing or retouching with paint can actually ruin an image further. Modern digital photo restoration eliminates this risk.
With digital tools, you can:
- Scan the original photo to create a high-resolution digital copy.
- Repair damages digitally while keeping the original photo safe and untouched.
- Restore faded colors, remove stains, and fix scratches with precise control.
This process preserves the original texture, tones, and contrast of the photo while repairing the visible damage. That’s how professionals restore old photos without losing image quality.
3. Steps to Fix Damaged Photos Without Quality Loss
Here’s a detailed breakdown of the process professionals follow to restore old or damaged photos carefully:
Step 1: Scan the Photo at High Resolution
Use a high-quality photo scanner to digitize the image. Scanning at 600 DPI or higher ensures that even the smallest details are captured. Avoid using phone cameras, as they may introduce shadows or distortions.
Step 2: Duplicate the Original File
Never work on the original scan directly. Create a duplicate file to preserve the original copy. This step is vital for non-destructive editing, which helps maintain original photo quality.
Step 3: Use Photo Editing Software
Tools like Adobe Photoshop, Lightroom, and AI-based photo restoration software help repair the image efficiently. These tools allow detailed cloning, healing, and color correction while keeping textures intact.
Step 4: Remove Dust, Scratches, and Tears
Use the Clone Stamp Tool or Healing Brush Tool to remove visible scratches and marks. This process should be done at a high zoom level to ensure precision without over-blurring details.
Step 5: Rebuild Missing Areas
For torn or missing parts, professionals reconstruct those sections using parts of the undamaged area. Layer masking and blending techniques help merge the repaired area seamlessly into the rest of the photo.
Step 6: Adjust Brightness, Contrast, and Colors
Old photos often lose contrast or turn yellowish. Carefully adjusting the brightness, contrast, saturation, and white balance can restore the photo’s natural look.
Step 7: Sharpen and Preserve Texture
Sharpening enhances the clarity of edges and fine details. However, over-sharpening can make the image look artificial. Professionals use subtle sharpening filters to keep the photo natural while enhancing focus.
Step 8: Save in High Quality
Once restoration is complete, save the image in TIFF or PNG format to preserve quality. JPEG compresses data and may result in slight quality loss.
4. How to Avoid Losing Original Photo Quality
Even with professional tools, maintaining quality requires careful editing practices. Here’s how professionals ensure no quality loss during restoration:
- Work with high-resolution scans only.
- Use non-destructive editing (with adjustment layers and masks).
- Avoid overusing filters or smoothing tools.
- Keep the photo’s natural texture instead of over-blurring.
- Save images in lossless formats like TIFF or PNG.
- Maintain consistent color accuracy using calibrated monitors.
The key is precision and subtlety. Over-editing can easily make photos look artificial, while careful photo retouching enhances natural details.
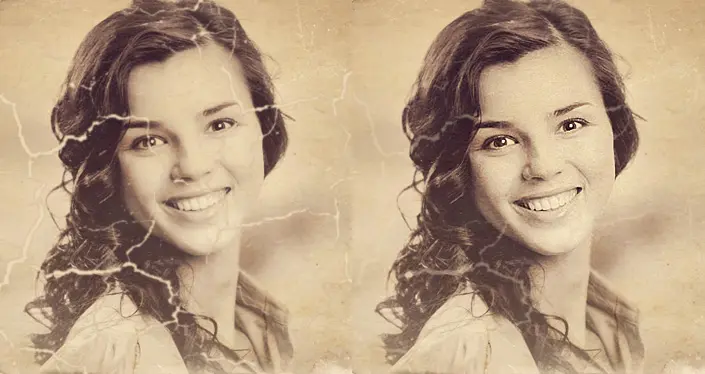
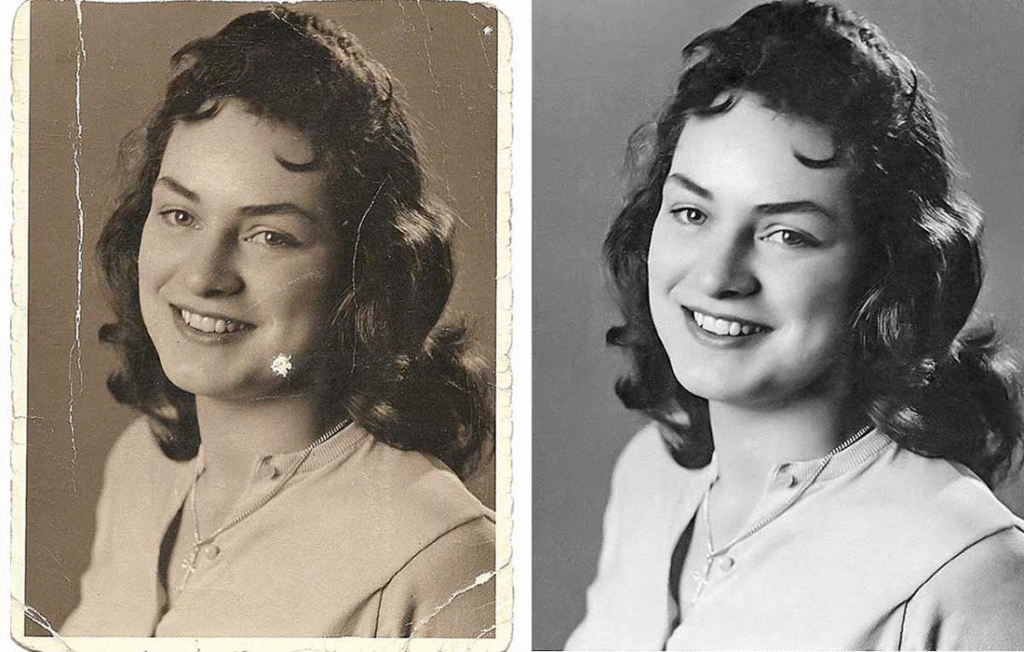
6. Restoring Faded or Discolored Photos
One of the most common issues in old photographs is fading. Over decades, exposure to light and air breaks down photo dyes, resulting in dull or yellowish tones.
To fix faded photos:
- Adjust levels and curves to enhance brightness and contrast.
- Use color correction tools to restore original hues.
- If the photo is black and white, converting it digitally helps emphasize clarity.
- For color photos, balance each channel (red, green, blue) to regain natural tones.
This process helps bring out hidden details and revive the original vibrancy of your memories.
7. Why You Should Choose Professional Photo Restoration Services
While DIY tools are available, professional photo restoration services offer expertise and precision that automated software often can’t match. Skilled editors understand texture, tone, and composition are essential for restoring photos without over-editing.
Professionals also use color calibration, texture balancing, and manual retouching techniques to ensure every detail looks natural and authentic. This approach maintains original photo quality while breathing life back into damaged pictures.
Final Thoughts
Old photos are treasures that connect us to our past. Restoring them requires precision, creativity, and care especially when the goal is to repair damaged photos without losing original quality. From removing scratches and stains to rebuilding missing details, every step matters in preserving both image and emotion.
If you’re looking for professional help to bring your cherished photos back to life, Emend Studios is here to help. With expertise in photo restoration, retouching, and color correction, Emend Studios ensures every image is carefully restored while maintaining its original texture and natural beauty. Our team uses advanced digital techniques to revive your memories with accuracy, warmth, and lasting quality. Trust Emend Studios to change your old, damaged photos into timeless keepsakes you can cherish forever.